Of all my free drawing lessons, developing your Artist's Eye is probably the most important

These free drawing lessons are probably the most important ones I can teach you.
In order to learn how to draw great you have to learn a fundamental concept. This concept has nothing to do with dexterity of the pencil, shading, perspective, proportions, or any other fancy tricks.
In order to really learn how to draw you have to see your subject matter differently. You have to learn to see objects as shapes. I call this seeing with the Artist's Eye.
Learning to see with the Artist's Eye boils down to three things.
- Look at complicated three dimensional (3D) subject matter, (landscapes, still life, figures, etc…).
- Mentally focus on the large abstract shapes and patterns of light and shadow in that subject matter, (don’t worry we’ll get to light in shadow a little later, for now just focus on the big shapes).
- Then draw or paint two dimensional shapes representing that subject matter; with the right proportions and placement on your paper or canvas.
This is the process of seeing with the Artist’s Eye.
It might sound simple but it can be hard for new artists to grasp what this means and how to do it. The biggest problem with all this stuff is that it’s all a mental thing. It’s all happening in your mind. Basically we’re trying to change the way our eyes perceive the things they’re looking at.
I am going to make this as simple and easy to understand as I can. The free drawing lessons below will help you start to think and see with your Artist’s Eye.
Think of the 3D world around you
like it was a picture torn out of
a book.
Make a viewfinder out of cardboard or mat board. With one eye closed look through it at everything you see around you.
Imagine that what you see is a flat picture out of a book. This will help trick your mind into seeing things as flat 2D (two dimensional) images. This is important because 2D is all we have to work with when we draw. We must learn to translate 3D subjects into 2D drawings.
If this is confusing to you, don’t worry. The next drawing lesson, (how to sketch the 3D world) goes into detail about this concept. It will show you a technique that will help you understand this clearly.

Here is a simple view finder you can cut out of mat board. The ratio of this view finder is 3:4 The same as 9x12, 12x16, 18x24.
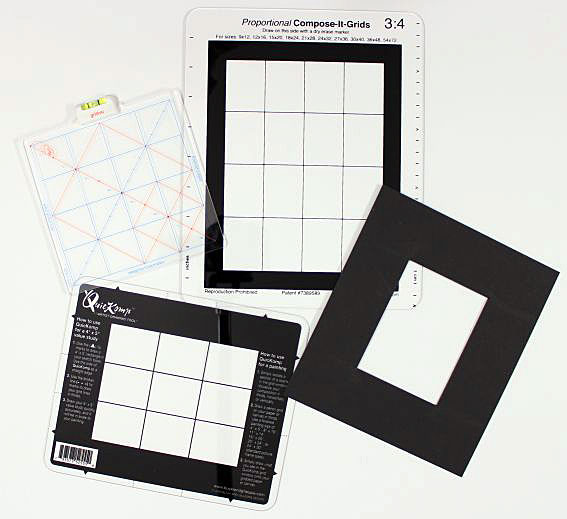
Here is an assortment of different viewfinders that I use. We will look at some of them more closely in upcoming lessons.
Everything you see is just another abstract shape.
Take a picture of a room filled with everyday objects. Print
it out so it fills an 8 1/2 x 11 piece of paper.
Now take a black sharpie marker and outline each object in the picture, (think big abstract shapes). Think of this as creating a puzzle of the different pieces in the picture. Now cut the pieces out with a scissors or knife (Be careful when you are cutting).
Spread the pieces out and look at all the unique shapes. Now turn the pieces over so all you see are white shapes. Can you tell what the objects are just by the shape? You might be surprised that you can’t!
The chair doesn’t look like a chair anymore. The table doesn’t look like a table. This exercise is showing us that we can’t draw items based on what we think they look like, we have to draw them based on the big abstract shapes they make.
This is a very important distinction to make. You have to start seeing things as shapes and not objects, (like trees, or boats, or cats). When you think tree your brain has a preconceived idea of what a tree is. (A big green leafy thing with a brown trunk).
You have to start looking at a tree and think (big abstract shapes made up of smaller abstract shapes). Can you begin to see the difference between looking at shapes and looking at objects? This is seeing with the Artist’s Eye.

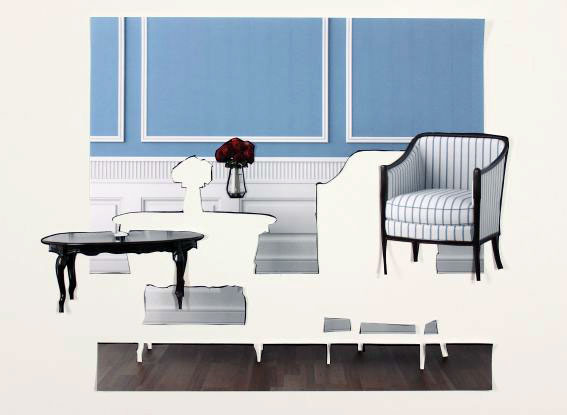
Here are the main elements outlined with a black sharpie and cut out.
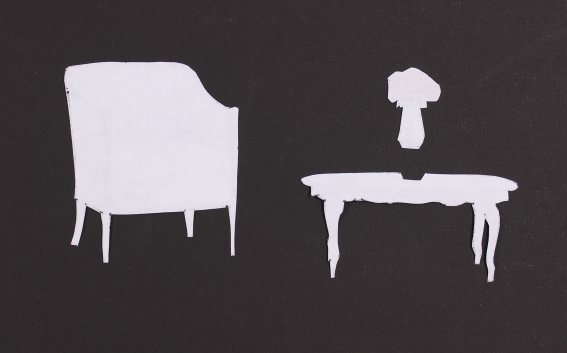
Here are the three main elements turned over. Notice how abstract the shapes are.
Squint your eyes down to simplify all those details.
When we look around us we are overwhelmed with details. Think of the thousands of leaves on a tree, millions of blades of grass in a field, or the tangled mass of curly hairs on your head. It would be nearly impossible to capture all those details in a drawing or painting.
But if you squint your eyes down, the less important details fade away and you are left with the simplified large abstract shapes of your subject.
Give it a try, look around your room and notice all the details. Now squint your eyes a bit and look how the details fade away and leave only large shapes of color and value. And the more you squint the more details you eliminate, but don’t shut your eyes all the way, that will eliminate everything.
Squinting is one of the most powerful tools you have as an artist, (and it’s free!). It will really help your drawing and is absolutely vital for painting. We will be squinting a lot going forward, so start getting used to squinting at your subjects and seeing them with your Artist’s Eye.

This photo of a field of tulips has a lot of detail, but if you squint...

A lot of the detail fades away and you have simple shapes of color and value.
Now that you have a good idea of what The Artist’s Eye is, I hope you can see why it's one of my most important free drawing lessons.
Next up is another drawing lesson that will help you develop your Artist Eye even further.
Lesson 5: How to sketch the 3d world
Home › Drawing Essentials: Level 1 › Lesson 4: The Artist's Eye


